1.制御方法
BrickPiの機能がだいぶ分かってきたので、これまでに得た知見をもとにHaskellでBrickPiを使えるようにする。
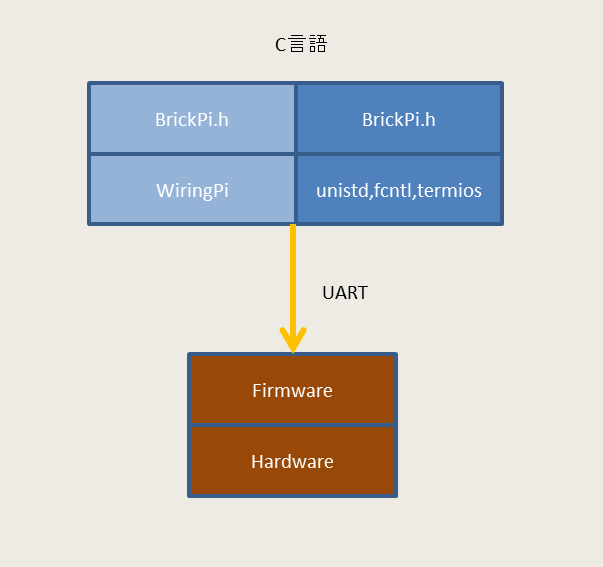
C言語での開発環境は次の図のようになっている。

BrickPi側の方は、ハードウェアとそれを制御するファームウエアで構成されている。Raspberry Piからはシリアル通信(UART)によりBrickPiのファームウェアに制御信号を送る。Rispberry Pi側には二種類のドライバーBrickPi.hが用意されている。一つはwiringPiを利用して作成されたであり、他の一つはLinuxの標準的なライブラリunistd.h,fcntl.h,termios.hなどを利用して作成されたものである。
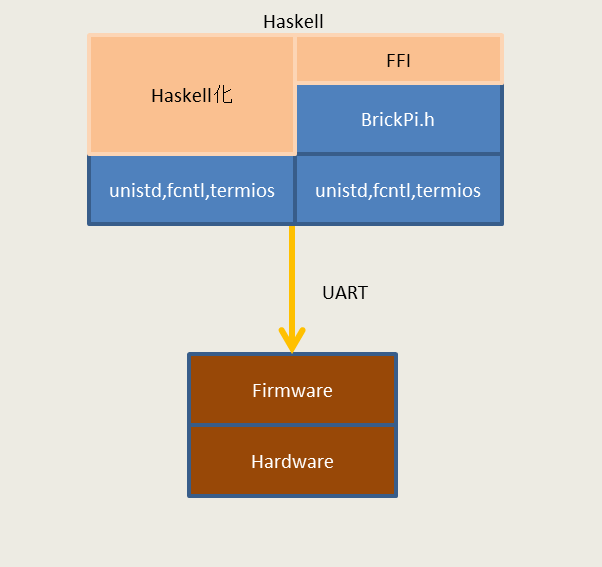
これまでの実験では、標準的なライブラリのほうが問題なく動いていることが分かっている。従って、Haskellで使えるようにするときは、BrickPi.hの部分をHaskellで記述し直す方法と、BrickPi.hはそのままにして外部関数インタフェース(Foreign Function Interface)を作成する方法とがある。ここでは、開発が簡単な後者を利用する。

2.ヘッダーファイルを分離
BrickPi.hにはいくつかの関数が用意されているが、それらの中で、外部から利用するのは次の関数である。
int BrickPiSetTimeout();
int BrickPiSetupSensors();
int BrickPiUpdateValues();
int BrickPiSetup();
また、モータやセンサを制御するための情報はBrickPiと呼ばれる構造体に書込まれる。この構造体は、配列の集まりとなっている。
struct BrickPiStruct{
  unsigned char Address        [2];     // Communication addresses
  unsigned long Timeout           ;     // Communication timeout (how long in ms since the last valid communication before floating the motors). 0 disables the timeout.

/*
  Motors
*/
  int           MotorSpeed     [4];     // Motor speeds, from -255 to 255
  unsigned char MotorEnable    [4];     // Motor enable/disable

/*
  Encoders
*/
  long          EncoderOffset  [4];     // Encoder offsets (not yet implemented)
  long          Encoder        [4];     // Encoder values

/*
  Sensors
*/
  long          Sensor         [4];     // Primary sensor values
  long          SensorArray    [4][4];  // For more sensor values for the sensor (e.g. for color sensor FULL mode).
  unsigned char SensorType     [4];     // Sensor types
  unsigned char SensorSettings [4][8];  // Sensor settings, used for specifying I2C settings.

/*
  I2C
*/
  unsigned char SensorI2CDevices[4];        // How many I2C devices are on each bus (1 - 8).
  unsigned char SensorI2CSpeed  [4];        // The I2C speed.
  unsigned char SensorI2CAddr   [4][8];     // The I2C address of each device on each bus.
  unsigned char SensorI2CWrite  [4][8];     // How many bytes to write
  unsigned char SensorI2CRead   [4][8];     // How many bytes to read
  unsigned char SensorI2COut    [4][8][16]; // The I2C bytes to write
  unsigned char SensorI2CIn     [4][8][16]; // The I2C input buffers
};
HaskellからCのプログラムを利用するときは、外部関数インタフェース(Foreign Function Interface)を介して行う。C言語の関数が、ユーザ定義のデータ型を引数としていないときは、比較的簡単に外部関数インタフェースを用意できる。しかし、引数に構造体や配列が含まれていると、インタフェースのコストが高くなる。
BrickPi.hへの制御データの読み込みと書き込みはは、配列の集まりである構造体BrickPiを介して行われる。そこで、インタフェースのコストを低減させるために、BrickPi.h側に構造体へのアクセスのための関数を用意する。とりあえず、モータを稼働できるかどうかを実験したいので、モータに関連する場所に書き込みができるように、BrickPi.hに次の関数を付け加える。
void SetAddress(int Index, unsigned char Value){
  BrickPi.Address[Index] = Value;
}

void SetMotorSpeed(int Index, int Value) {
  BrickPi.MotorSpeed[Index] = Value;
}

void SetMotorEnable(int Index, unsigned char Value){
  BrickPi.MotorEnable[Index] = Value;
}
BrickPiが用意しているBrickPi.hとtick.hはコードの部分まで内蔵している。そこで、これらのファイルはプログラムのファイル(hをcにして、BrickPi.cとtick.c)にする。そして、外部から参照できる関数を定義したヘッダーファイルをそれぞれに用意する。新しいBrickPi.hとtick.hは次のようになる。
/*
BrickPi.h
*/

void SetAddress(int Index, unsigned char Value);
void SetMotorSpeed(int Index, int Value) ;
void SetMotorEnable(int Index, unsigned char Value);

int BrickPiSetTimeout();
int BrickPiSetupSensors();
int BrickPiUpdateValues();
int BrickPiSetup();
/*
tick.h
*/
int ClearTick();
unsigned long CurrentTickMs();
unsigned long CurrentTickUs();
ここで、これまでテストに使ってきたプログラムLEGO - Motor Test.cをコンパイルして実行する。
/*
*  Jaikrishna
*  t.s.jaikrishna<at>gmail.com
*  Initial date: June 20, 2013
*  Updated:  Feb 17, 2015 (John)
*  Based on Matthew Richardson's Example for testing BrickPi
*  You may use this code as you wish, provided you give credit where it's due.
*
*  This is a program for testing the RPi BrickPi driver with Lego Motor on Port1
*/

#include <stdio.h>
#include <math.h>
#include <time.h>

#include "tick.h"
#include "BrickPi.h"

#include <linux/i2c-dev.h>
#include <fcntl.h>

// Compile Using:
// sudo gcc -o program "LEGO - Motor Test.c" -lrt -lm
// Run the compiled program using:
// sudo ./program

#define PORT_A 0
#define PORT_B 1
#define PORT_C 2
#define PORT_D 3

int result,v,f;
#undef DEBUG


int main() {
  ClearTick();

  result = BrickPiSetup();
  printf("BrickPiSetup: %d\n", result);
  if(result)
    return 0;

  SetAddress(0, 1);
  SetAddress(1, 2);

  SetMotorEnable(PORT_A, 1);
  SetMotorEnable(PORT_B, 1);

  result = BrickPiSetupSensors();
  printf("BrickPiSetupSensors: %d\n", result);
  v=0;
  f=1;
  if(!result){

    usleep(10000);

    while(1){
      result = BrickPiUpdateValues();
          printf("BrickPiUpdateValues: %d\n", result);
      if(!result){
		printf("%d\n",v);
		if(f==1) {
			if(++v > 300) f=0;
			SetMotorSpeed(PORT_A, 200);
			SetMotorSpeed(PORT_B, 200);
			BrickPiUpdateValues();
			}
		else{
			if(--v<0) f=1;
			SetMotorSpeed(PORT_A, -200);
			SetMotorSpeed(PORT_B, -200);
			BrickPiUpdateValues();
			}
       }
      usleep(10000);
    }
  }
  return 0;
}
コンパイルは次のように行う。
sudo gcc -o program "LEGO - Motor Test.c" BrickPi.c tick.c -lrt -m -L/usr/local/lib
実行は次のようにする。
sudo ./program
モータがうまく動けば成功である。次はHaskellからの利用になるが、この時、BrickPi.cとtick.cのオブジェクトファイルが必要となるので、次の操作で用意しておく。
sudo gcc -c "LEGO - Motor Test.c" BrickPi.c tick.c -lrt -m -L/usr/local/lib